
Deploying Static Node.JS Sites
I work with a lot of people who are just starting to learn web development. Often they develop by creating a folder on their computers, populating it with HTML, CSS, and JavaScript files, and opening it with a web browser.
This is a great start, but it's difficult to deploy and show your friends, and it doesn't help demistify the idea of servers and the Internet. If you are someone who develops this way, this blog post will help you take the next step toward putting your static site online and serving it with a webserver. Let's get started!
Note: you will need a basic knowledge of the command line to complete this tutorial. If you have no experience using the command line, I highly recommend you complete the first two chapters at http://www.ee.surrey.ac.uk/Teaching/Unix/unix1.html and then come back.
Tools
This might sound complex, but I promise you'll get the hang of it. We won't cover anything beyond what we need to deploy a website. Specifically, we won't cover templating, middleware, or any backend topics. There are three technologies we are going to incorporate.
- Web server: Node.JS
- Version control: Git
- Hosting platform: Heroku
Install Node.JS
Navigate your browser to nodejs.org, and click install. Follow the instructions to install node. To make sure that it's installed, open your terminal of choice (I like iTerm 2) and run node -v. You should see something like "v0.10.20".
Install Git
Chances are you have git already. To check, run git --version. You should see something like "git version 1.7.12.4 (Apple Git-37)". If you see "command not found," following the instructions at http://git-scm.com/book/en/Getting-Started-Installing-Git to get that working.
Sign up for Heroku
Sign up for Heroku at https://www.heroku.com/. Heroku is a hosting platform for Ruby and Node.JS apps.
Install the Heroku Command Line Interface (CLI)
Navigate your browser to https://devcenter.heroku.com/articles/heroku-command.Follow the instructions to install the Heroku CLI. To make sure that it's installed, run heroku --version. You should see something like "heroku-toolbelt/2.39.0 (x86_64-darwin10.8.0) ruby/1.9.3." As the tutorial instructs, make sure you log in with heroku login.
Note: Another great hosting platform for Node.JS apps is nodejitsu. We are using Heroku because it gives you the most for free.
NPM
NPM stands for Node Package Manager. Isaac Schlueter, who now maintains Node.JS, built it when node was in its infancy. Like any package manager, NPM allows you to quickly download and include other people's code libraries in your projects. In node, these are called "node modules." If you've used Ruby before, they're a lot like RubyGems.
Express
We will be using Express.js. TJ Holowaychuck built and maintains express, which is probably the most popular Node.JS web application framework. He is very prolific in the node community and has lots of other modules that I'm sure you will use as well. To install express, run npm install express -g. If that fails, you may have to retry with sudo npm install express -g.
Getting up and running
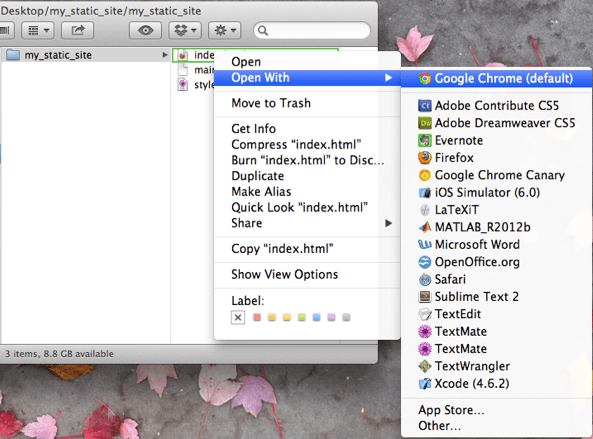
Okay, we've installed everything we need. Now for the exciting part! Navigate to your programming directory (e.g. ~/code) and run express my_site. (Replace "my_site" with the name of the directory you want your site to live in.)
Next, let's navigate into our new app directory: cd my_site. We have to make one minor change. Open the file under "/routes/index.js". You should see something like
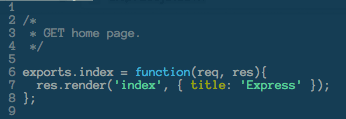
Change:
res.render('index', { title: 'Express' });
to say:
res.redirect('/index.html');
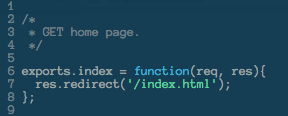
Note: If you name your homepage something besides "index.html", replace "index.html" with the name of your homepage (e.g. splash.html).
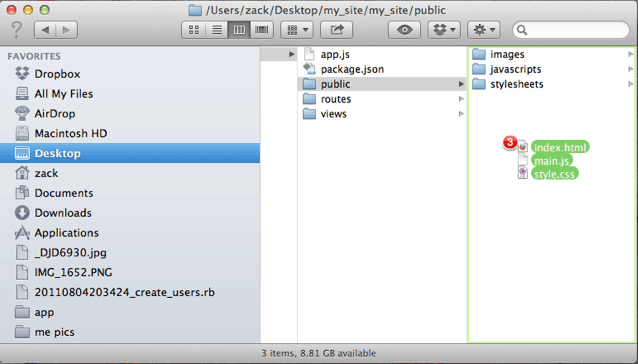
Viewing our site
In the root directory of your site (in our example that's called "my_site"), you'll notice a folder called "public." Copy all of the files in your project over to that public folder.
Now, run node app.js. This should start a server running on your machine on port 3000. (Port 3000 is the default for express apps.) To view your site, open your browser and type "localhost:3000" in the url bar: ![]()
Deploying live
We have to do a few things with Git and Heroku to make sure everything works. First, navigate to the root directory of the site. Then run the following commands:
git init
git add .
git commit -m "Initial commit."
heroku create
After running heroku create, you should see something like
Creating shielded-bastion-7362... done, stack is cedar
http://shielded-bastion-7362.herokuapp.com/ | git@heroku.com:shielded-bastion-7362.git
Git remote heroku added
Finally, run:
git push heroku master
If all goes to plan, it should say
http://shielded-bastion-7362.herokuapp.com deployed to Heroku
Woohoo! You did it. Now you can turn any folder that contains HTML, CSS, and JavaScript files into a real-life website.